Artificial intelligence on the Raspberry Pi
Learning Experience

© Lead Image © Charles Taylor, 123RF.com
You don't need a powerful computer system to use AI. We show what it takes to benefit from AI on the Raspberry Pi and what tasks the small computer can handle.
Artificial intelligence (AI) is on everyone's minds, not least because of chatbots and the ChatGPT text generator. Of course, the capabilities that AI has developed go far beyond chats with a chatbot on countless websites. For example, AI can be used to process acoustic speech signals, and it is the precondition for autonomous driving. Some applications – and generating AI models – require computers with powerful processors and a generous helping of storage space and RAM. Small computers like the Raspberry Pi, on the other hand, are more likely to benefit from ready-made methods and applications that draw on AI for their implementation.
All of these processes are founded on machine learning (ML), which itself is based on self-adapting algorithms that process information from reference data. Deep learning, as a subset of machine learning, uses artificial neural networks that comprise multiple hierarchical processing layers. The neurons of the network are interconnected in multiple ways, with the individual layers increasingly abstracting the reference data they receive. Solutions or actions are then derived from the results.
TensorFlow
TensorFlow [1], released by Google AI in 2015, is an open source framework that aims to simplify the development and training of deep learning models. It supports numerous programming languages and can be used for various purposes, such as the linguistic data processing in various Google services. It can also be used to recognize and classify patterns and objects in images.
TensorFlow Lite [2] is a solution designed specifically for the embedded and Internet of Things (IoT) spaces, addressing the hardware limitations that exist there. The version does not require Internet access because it does not send data to servers, which is a good thing not just in terms of data protection, but to avoid latency and reduce energy requirements. TensorFlow Lite is not suitable for training models, but it can apply pre-trained models. The framework uses reduced model sizes, but the models are still useful for various cases. Google also provides a web page for generating models on the basis of object classifications; you can use these to create your own model and then deploy it in TensorFlow Lite.
To detect objects on the Raspberry Pi with TensorFlow Lite, you need a fourth generation device with a connected camera. Although some third generation Raspberry Pis are suitable for AI applications in principle, they are very slow because of their hardware limitations, especially in terms of RAM. When it comes to the camera for AI applications, it doesn't matter whether you choose one designed specifically for the small computer that connects directly or use an arbitrary USB camera. If you prefer an external camera, however, make sure the Raspberry Pi OS supports your choice.
The first step is to download the latest 64-bit release of Raspberry Pi OS [3] and transfer it to a microSD card with at least 16GB. To do so, either use a graphical tool such as balenaEtcher or enter the following command at the prompt:
dd if=</path/to/operating system image> of=/dev/mmcblk0 bs=4M
Make sure the microSD card supports fast read and write mode. It should at least comply with the Class 10 specification. Boot your Raspberry Pi from the microSD card and turn to the basic graphical configuration of the system. Run the usual commands to update the operating system:
sudo apt-get update
sudo apt-get upgrade
If you want to use an external camera for object detection, connect it to the Pi and install an application that accesses the camera on the system, such as the Cheese graphical program or the fswebcam command-line tool. Also, if you are using an external USB camera, make sure that its resolution is sufficient: The fewer clear-cut distinguishing features the objects to be detected have, the higher the camera resolution needs to be. If you use the Raspberry Pi's own camera, it must be connected to the camera port of the single-board computer before you boot the system for the first time.
Installation
Because of the fast pace of technical developments in the field of deep learning and the many components required, installing TensorFlow Lite on the Raspberry Pi is anything but trivial and is by no means something you can do quickly. Constantly changing dependencies and new versions make it difficult to give universal guidance. However, you will definitely want to make sure that you are using the 64-bit variant of Raspberry Pi OS. To verify that you have the correct version of the operating system, enter:
uname -a
The output must include the aarch64 parameter. If it is missing, you are running the 32-bit variant of Raspberry Pi OS, which rules out any meaningful deployment of TensorFlow Lite. You also need the correct matching version of the C++ compiler (GCC) in place. To check, type
gcc -v
at the prompt; the output must be --target=aarch64-linux-gnu.
If these conditions apply, the next step is to adjust the swap size of the system. By default, only 100MB are reserved as a swap partition on the Raspberry Pi 4. You will want to increase this value to 4GB if you are using a Raspberry Pi 4 with 4GB of RAM. Unfortunately, Raspberry Pi OS limits swap memory to a maximum of 2GB, and you will need to edit two files to be able to continue. The first task is to disable the swap space
sudo dphys-swapfile swapoff
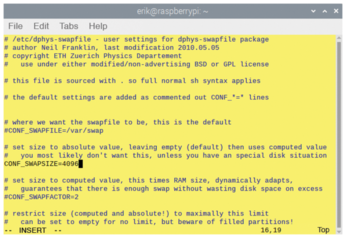
and open /sbin/dphys-swapfile in an editor to look for the CONF_MAXSWAP parameter (Figure 1). Set the value specified to its right to 4096 and save your change. In a second file, /etc/dphys-swapfile, look for the CONF_SWAPSIZE=100 option, and replace the value of 100 with 4096 for a Raspberry Pi 4 with 4GB of RAM. For a device with only 2GB of RAM, the swap size should be set to 4096MB, whereas 2048MB is fine for a model with 8GB of RAM. After saving the modified file, enable the new swap size and check it by running:
sudo dphys-swapfile swapon
free -m
If everything meets the specifications, you can install TensorFlow Lite. The software will work with Python, but the C++ API libraries are preferable because of the far superior processing speed. Listing 1 shows how to get TensorFlow Lite v2.6.0, including all of its dependencies, and how to compile with C++. The build takes about half an hour.
Listing 1
Installing TensorFlow Lite
$ sudo apt-get install cmake curl
$ wget -O tensorflow.zip https://github.com/tensorflow/tensorflow/archive/v2.6.0.zip
$ unzip tensorflow.zip
$ mv tensorflow-2.6.0 tensorflow
$ cd tensorflow
$ ./tensorflow/lite/tools/make/download_dependencies.sh
$ ./tensorflow/lite/tools/make/build_aarch64_lib.sh
After compiling, you need to install modified TensorFlow Lite FlatBuffers [4]; otherwise, numerous GCC error messages will appear. Listing 2 shows you how to remove the old FlatBuffers and replace them with a bug-fixed version.
Listing 2
Installing FlatBuffers
$ cd tensorflow/lite/tools/make/downloads
$ rm -rf flatbuffers
$ git clone -b v2.0.0 --depth=1 --recursive https://github.com/google/flatbuffers.git
$ cd flatbuffers
$ mkdir build
$ cd build
$ cmake ..
$ make -j4
$ sudo make install
$ sudo ldconfig
$ cd ~
$ rm tensorflow.zip
This change is essential because the original TensorFlow FlatBuffers no longer work with current GCC versions. The bug-fixed variant replaces the obsolete serialization libraries with adapted versions.
Options
TensorFlow Lite offers the option of recognizing objects with pre-built models that can be classified. However, you can only create models in the "full-fledged" TensorFlow variant. TensorFlow Lite and a Raspberry Pi are not suitable because you need masses of compute power. The recommended approach is therefore to create new models from reference data with GPU processors because they will perform the required computations far faster than CPUs. Also, the models generated in TensorFlow are not compatible with TensorFlow Lite. You will need to convert them for use in the Lite variant. Google has already created numerous models for TensorFlow Lite that you can deploy on the Raspberry Pi. The TensorFlow project website provides detailed information [5] on how to convert models to the TensorFlow Lite format.
Buy this article as PDF
(incl. VAT)
Buy Linux Magazine
US / Canada
UK / Australia
Subscribe to our Linux Newsletters
Find Linux and Open Source Jobs
Subscribe to our ADMIN Newsletters
Support Our Work
Linux Magazine content is made possible with support from readers like you. Please consider contributing when you’ve found an article to be beneficial.

News
-
Canonical Releases Ubuntu 24.04
After a brief pause because of the XZ vulnerability, Ubuntu 24.04 is now available for install.
-
Linux Servers Targeted by Akira Ransomware
A group of bad actors who have already extorted $42 million have their sights set on the Linux platform.
-
TUXEDO Computers Unveils Linux Laptop Featuring AMD Ryzen CPU
This latest release is the first laptop to include the new CPU from Ryzen and Linux preinstalled.
-
XZ Gets the All-Clear
The back door xz vulnerability has been officially reverted for Fedora 40 and versions 38 and 39 were never affected.
-
Canonical Collaborates with Qualcomm on New Venture
This new joint effort is geared toward bringing Ubuntu and Ubuntu Core to Qualcomm-powered devices.
-
Kodi 21.0 Open-Source Entertainment Hub Released
After a year of development, the award-winning Kodi cross-platform, media center software is now available with many new additions and improvements.
-
Linux Usage Increases in Two Key Areas
If market share is your thing, you'll be happy to know that Linux is on the rise in two areas that, if they keep climbing, could have serious meaning for Linux's future.
-
Vulnerability Discovered in xz Libraries
An urgent alert for Fedora 40 has been posted and users should pay attention.
-
Canonical Bumps LTS Support to 12 years
If you're worried that your Ubuntu LTS release won't be supported long enough to last, Canonical has a surprise for you in the form of 12 years of security coverage.
-
Fedora 40 Beta Released Soon
With the official release of Fedora 40 coming in April, it's almost time to download the beta and see what's new.